Install an OS From an ISO
Licensing - Bring Your Own License
We do not provide OS or software licenses
Euronodes does not sell, provide, or include licenses for any operating system or commercial software, including:
-
- Win10 / Win11 → unlicensed. They run indefinitely without activation, but with cosmetic limits (activation watermark, disabled personalization) until you supply your own license key.
- Windows Server (2019 / 2022 / 2025) → evaluation editions with a real time-limited trial (typically 180 days). You must convert to a licensed edition using your own key before the trial expires.
Windows - Desktop or Server, any edition. Our Windows templates ship as:
Either way, you must bring your own Microsoft license.
-
Red Hat Enterprise Linux (RHEL) - no subscription is included; bring your own.
- Other licensed software - cPanel, DirectAdmin, commercial databases, etc.
Free and open-source distributions (Debian, Ubuntu, Rocky, Alma, CentOS Stream, BSDs, etc.) require no license - those are fine to use as-is.
You are fully responsible for obtaining valid licenses, activation, and ongoing compliance.
Exception: Plesk - 15% below official price
We are an official Plesk reseller. If you want Plesk on your VM, you can purchase the license directly through us instead of bringing your own. Our Plesk pricing is 15% below the official Plesk price across all editions. Open a sales/billing ticket for the exact current price of the edition you need.
Overview
Pick the right starting template
On the VM ordering page, the OS tabs determine how the VM is provisioned at the hypervisor level - firmware, Secure Boot, TPM, virtio drivers. The OS image you boot later has to match what the template was prepared for.
- Custom Linux / BSD / other ISO → pick any Linux template (e.g. Debian). All Linux templates share the same firmware profile, so it doesn't matter which one - you'll wipe it with your ISO anyway. Then mount your ISO and continue in the NoVNC console.
- Custom Windows ISO (PL, RU, IoT, evaluation builds, Server editions, etc.) → use the Windows tab and pick the closest version (see below).
Installing a Custom Windows ISO - Read This First
Order a Windows template, not a Linux VM
If you want to install your own custom Windows ISO (different language like PL / RU, an IoT or LTSC edition, an evaluation build, a Server edition, a custom image, etc.), you must order one of our Windows templates first, then swap the ISO and reinstall.
You cannot order a Linux VM and reformat it to Windows. It will not boot, and we cannot fix it from our side.
Why this matters
Our Windows templates are provisioned with the correct UEFI Secure Boot keys, TPM state, and firmware settings that Windows requires. Linux templates do not carry these - they are configured for BIOS/UEFI-without-Secure-Boot and lack the TPM provisioning.
Reinstalling Windows on top of a Linux VM will fail at boot, at the licensing step, or at first activation. The hypervisor-level firmware cannot be changed by you from inside the VM.
Correct path for custom Windows installs
-
Win10.en- for custom Windows 10 ISOsWin11.en- for custom Windows 11 ISOsSrv.2019.Std.Desktop.En.Trial- for custom Windows Server 2019Srv.2022.Std.Desktop.En.Trial- for custom Windows Server 2022Srv.2025.Std.Desktop.En.Trial- for custom Windows Server 2025
On the ordering page, open the Windows dropdown and pick the template closest to the version you want to install:
It does not have to be an exact match - pick the same major family (Win10/11 or Server 20xx). The firmware setup is what matters, the bundled OS will be replaced.
-
Wait for the VM to provision
- Power it off
- Upload your custom Windows ISO (Steps 1–2 below)
- Mount your ISO, set boot order, and reinstall (Steps 3–5 below)
The standard Windows Installation Guide walks through the actual installer steps.
For Linux / BSD / Other Custom ISOs
Any Linux template will do
On the ordering page, pick any Linux template (Debian is a fine default). All Linux templates share the same firmware profile, so the OS bundled with the template is irrelevant - your ISO will overwrite it. After provisioning, follow Steps 1–5 below and complete the installation in the NoVNC console.
Step 1: Upload ISO
Upload Your ISO Image
- Navigate to Panel → ISO Images → Upload ISO File
- Enter your ISO url, and press the button "Upload ISO File"
- Wait for upload to complete before proceeding
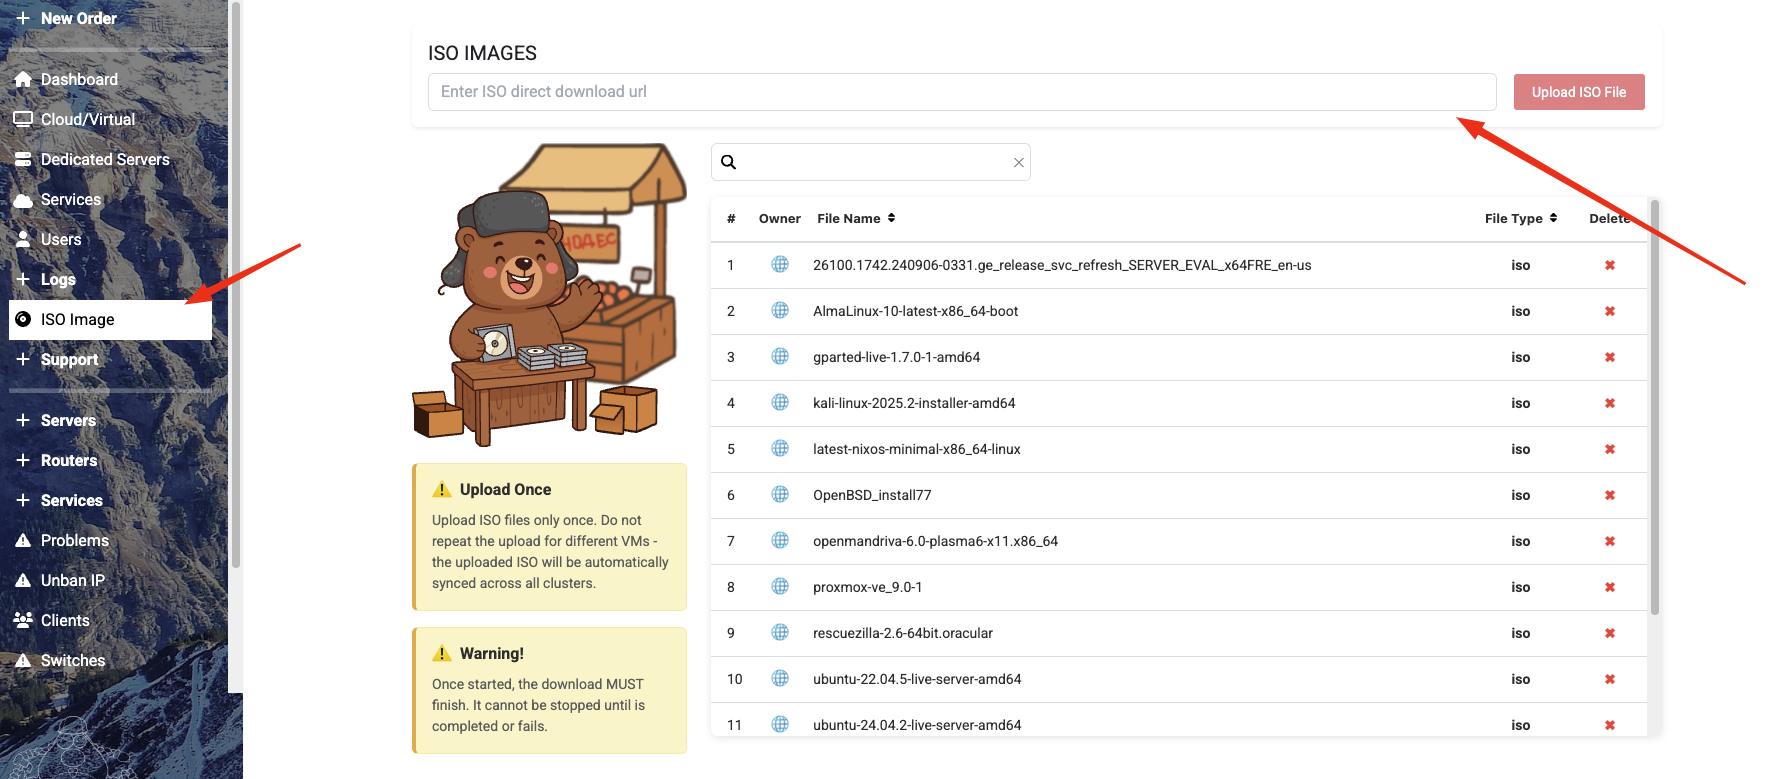
Supported Formats
ISO Requirements
- Format:
.isofiles only (raw ISO format) - Compression: Upload uncompressed ISOs (not zipped)
Step 2: Mount ISO
Attach ISO to VM
- Go to Cloud/Virtual
- Navigate to Settings on your VM (Gear Icon)
- Open the "Image" tab
- Find your ISO in the list and press the "Mount" button next to it

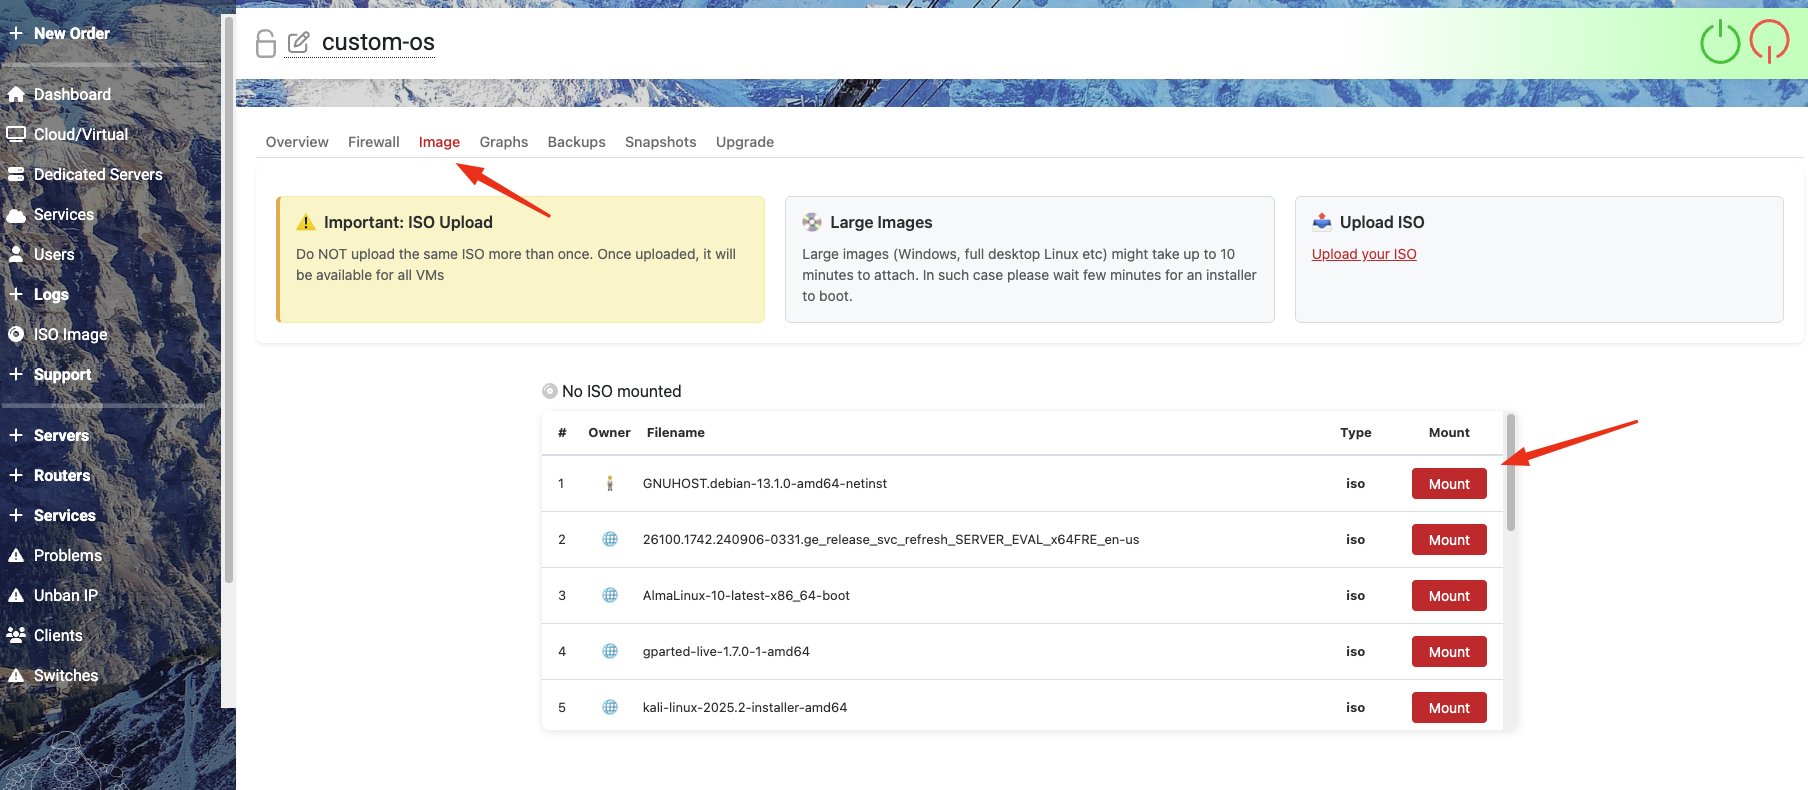

Mounting Tips
Important Notes
- Ensure the VM is stopped before mounting ISOs
- Only one ISO can be mounted at a time
- Detach any existing ISO before mounting a new one
Step 3: Set Boot Order
Configure Boot Priority
- Go to VM Options
- Move CD/DVD: ISO to the top of the boot order
- Save the configuration
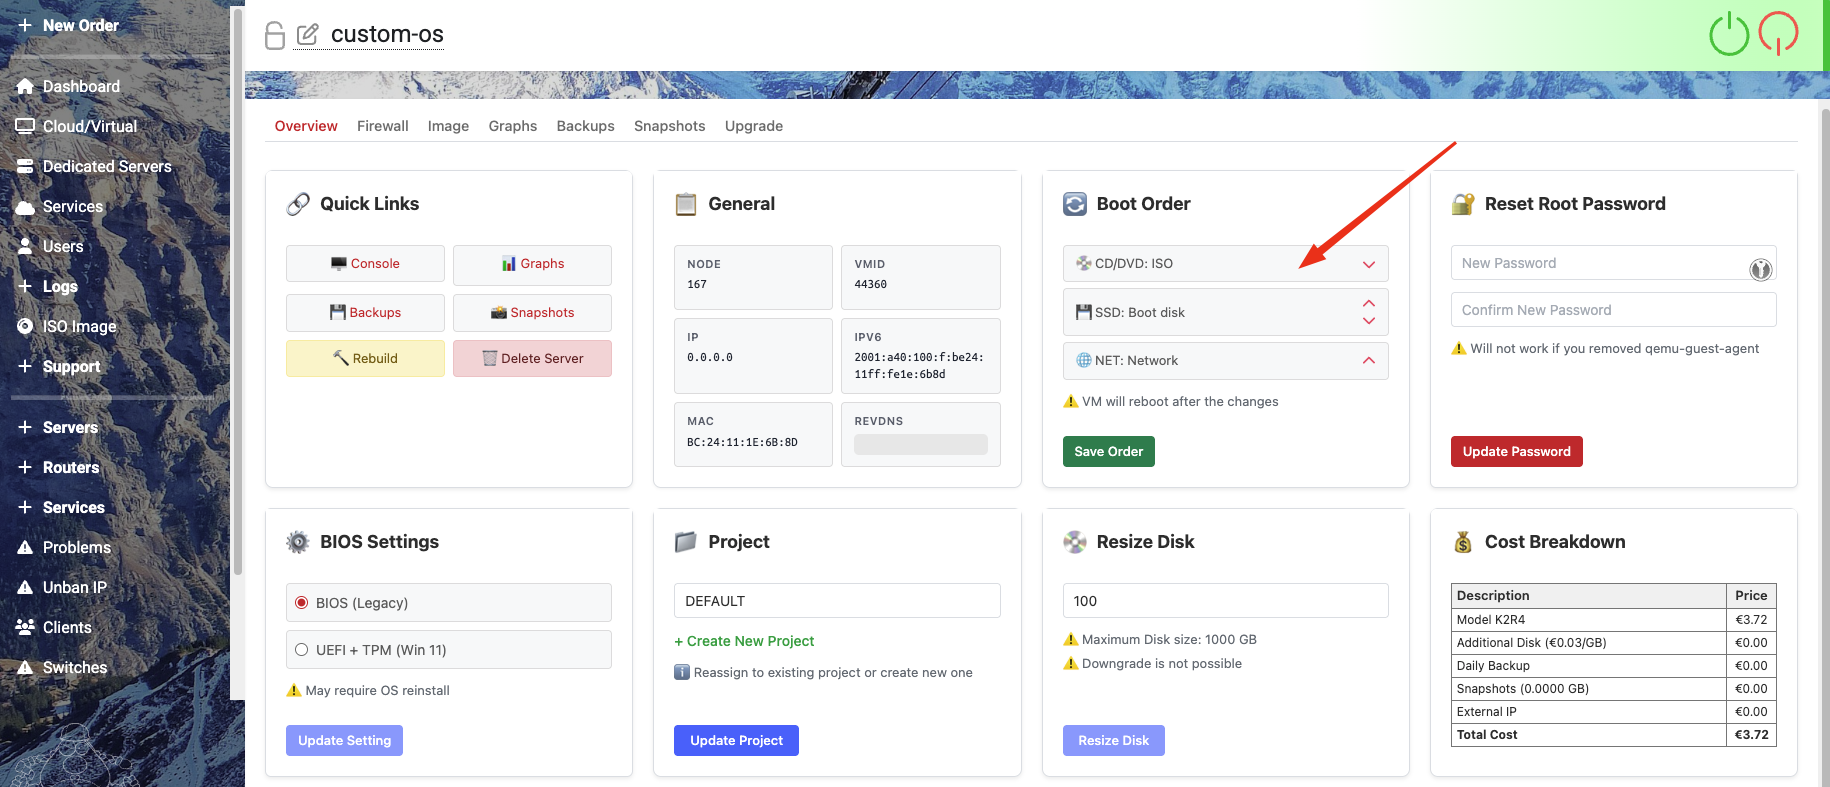
Boot Order Configuration
Proper Boot Sequence
Recommended boot order:
- CD/DVD Drive
- Hard Disk
- Network
Step 4: Firmware Settings (Linux / BSD / Other)
Default firmware is fine for most OSes
Modern Linux distributions and BSDs boot fine with the default firmware settings. You do not normally need to change anything here.
Do NOT switch a Linux VM's firmware to install Windows
Manually flipping BIOS → UEFI + TPM on a Linux VM is not enough to install Windows. The Secure Boot keys and TPM state are configured at provisioning time on Windows templates. Linux templates cannot be converted.
If you need Windows, see Installing a Custom Windows ISO at the top of this page.
Step 5: Starting Installation
Last Steps
- Start the VM
- Open the console and proceed with installation

Cleanup Process
After Installation
- Remove the ISO from the CD/DVD drive to prevent boot loops
- Change boot order to prioritize the hard disk
Installer Shows No Disks (Windows on a Windows template)
Storage Driver Issues
Problem: The Windows installer can't see the virtual disk.
Solutions (apply on a Windows-template VM, not a Linux one):
- Load VirtIO/SCSI drivers during installation
- Mount the VirtIO driver ISO alongside your Windows ISO
- See our Windows Installer Shows No Disks guide
Contact Support
Need Help?
- Open Support Ticket - Use your client panel to create a support ticket
- Upload Problems: Include file size and error messages in your ticket
- Installation Help: Specify OS and error details in your ticket